
The Art of Perfect Bass: Understanding the Dual Subwoofer Wiring Diagram
To truly unlock the deep, clear low-end frequencies of your sound system, understanding a dual subwoofer wiring diagram has become an essential skill. Connecting two subwoofers correctly ensures your amplifier runs efficiently while delivering maximum acoustic performance.
Whether you are upgrading a daily driver car audio setup or building a dedicated home theater, the way you configure your speakers determines the longevity and quality of your audio investment. Let's explore why this technical layout is capturing the attention of audio fans nationwide and how you can master it.
---
Why the Dual Subwoofer Wiring Diagram Is Gaining Attention in the US
Historically, custom audio installation required a trip to a specialized shop and a hefty labor fee. Today, a wealth of digital resources has democratized the process, making complex electrical schematics highly searchable and accessible to the everyday consumer.
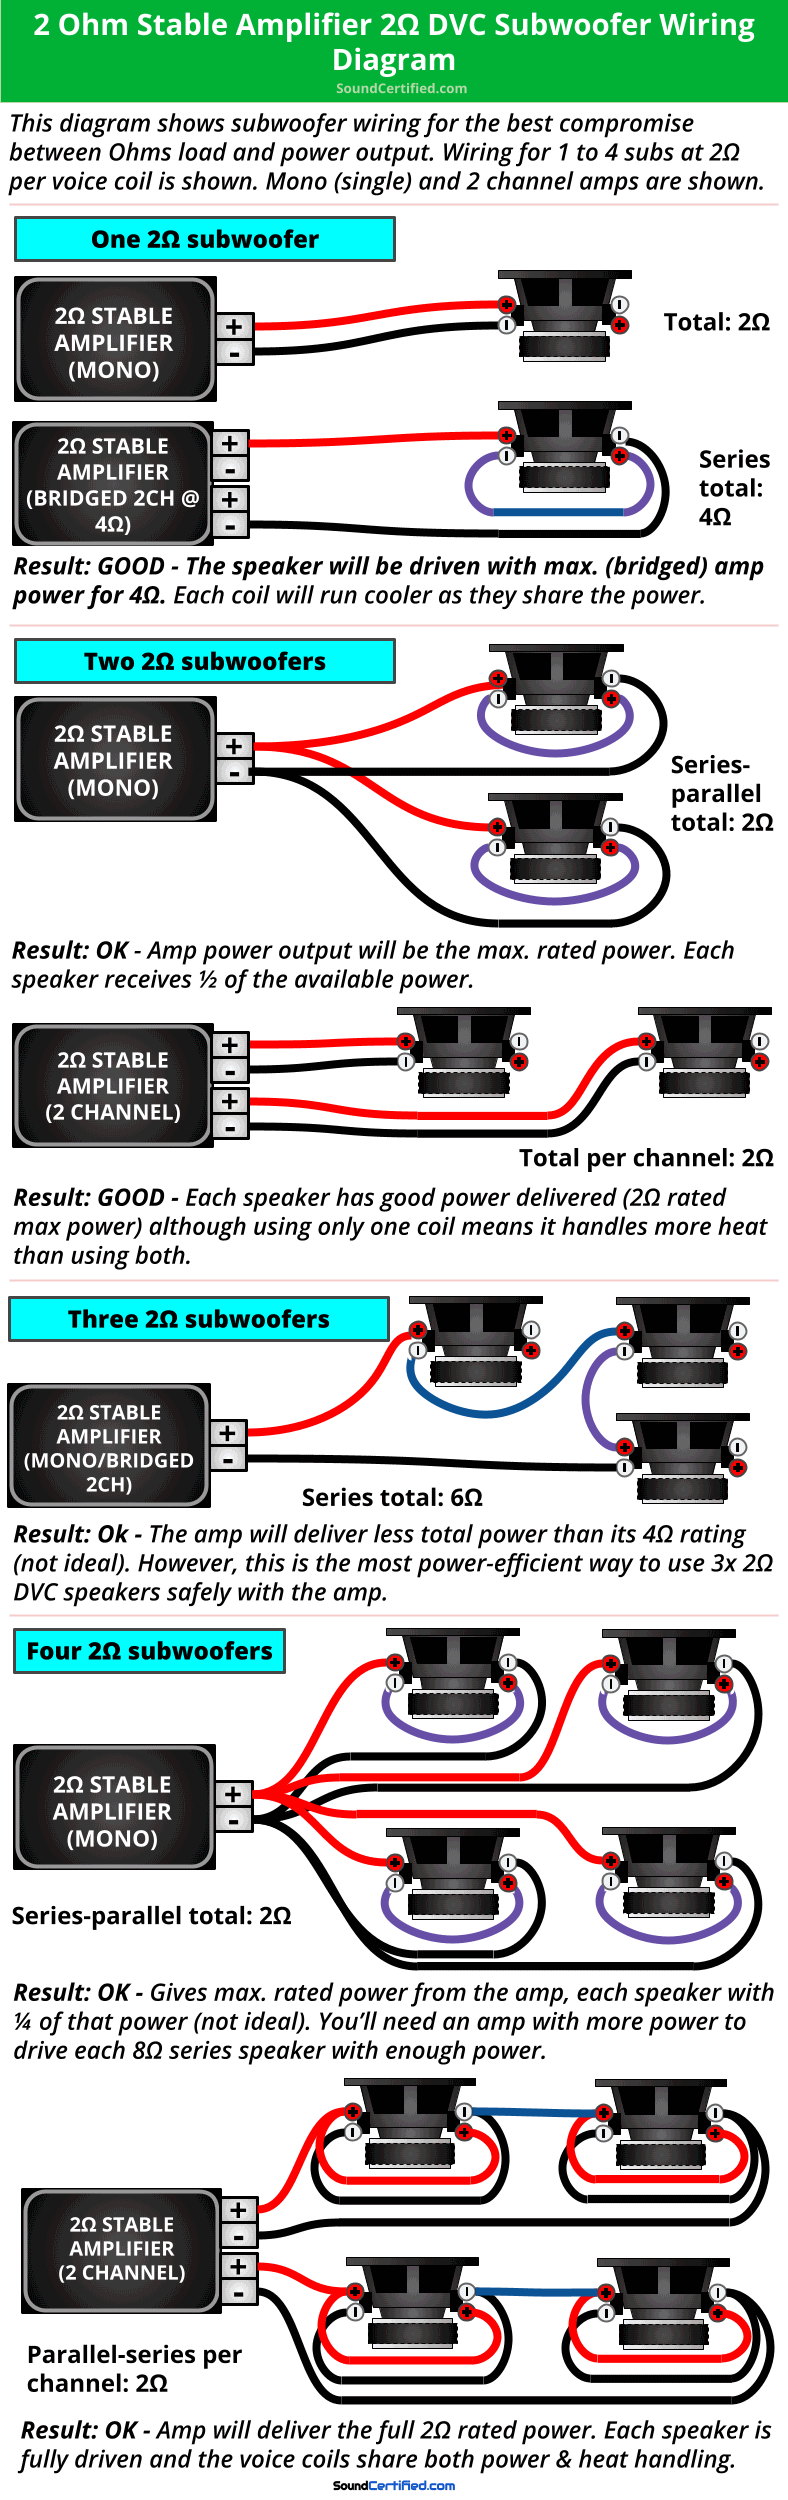
Additionally, modern amplifiers and subwoofers are more powerful and versatile than ever. To get the most out of these advanced components, users must match the electrical resistance, or impedance, of their speakers to the capabilities of their amplifier.
This technical requirement has turned the search for a reliable dual subwoofer wiring diagram into a major trend, as builders look for safe, proven ways to maximize their sound quality without risking equipment damage.
---

How a Dual Subwoofer Wiring Diagram Actually Works
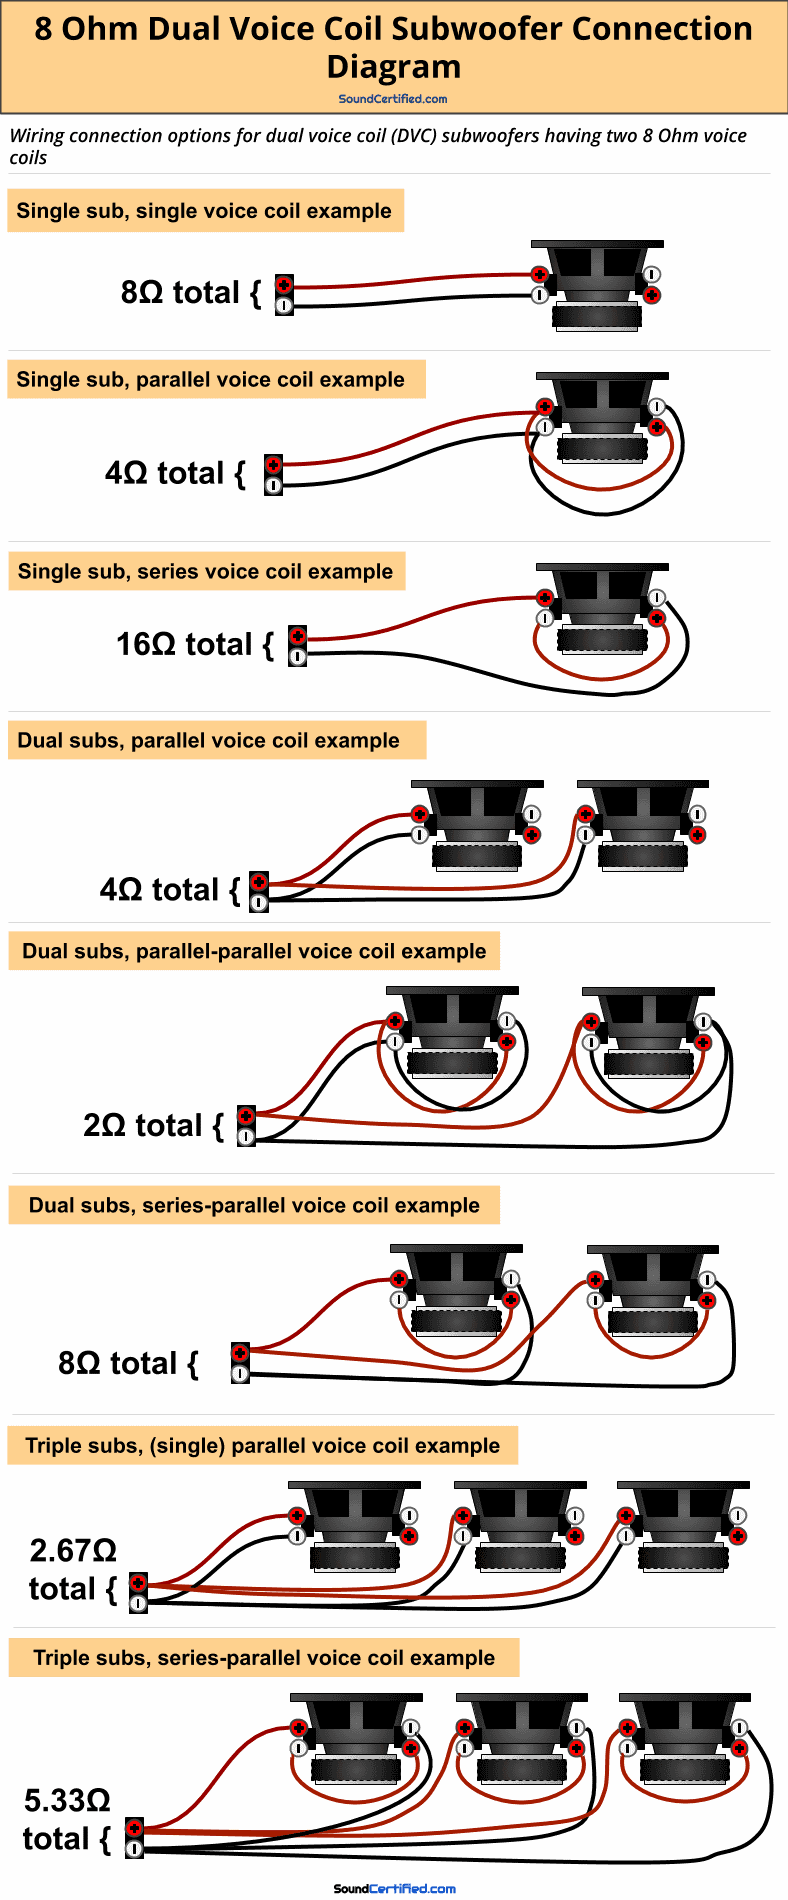
When configuring two subwoofers, you have two primary methods for routing the speaker wires: parallel wiring and series wiring. A proper schematic shows you exactly how to connect the positive and negative terminals to achieve your target impedance.
The Mechanics of Parallel Wiring
This method lowers the overall impedance that the amplifier sees. For example, wiring two 4-ohm single voice coil subwoofers in parallel drops the total load to 2 ohms. This allows the amplifier to deliver significantly more wattage, resulting in louder volume.
The Mechanics of Series Wiring
Then, you run a jumper wire from the negative terminal of the first subwoofer to the positive terminal of the second subwoofer. Finally, the negative terminal of the second subwoofer connects back to the negative terminal of the amplifier.
This method increases total impedance. Wiring two 4-ohm subwoofers in series results in an 8-ohm load, which reduces the power draw from the amplifier but allows it to run much cooler and with less strain.
---
Common Questions People Have About Subwoofer Wiring
What is the difference between single and dual voice coil subwoofers?
[IMAGE5]Can you mix different subwoofer brands or sizes in the same setup?
How does impedance matching protect your amplifier from overheating?
Do I need a different diagram if my amplifier is bridged?
---
Opportunities and Considerations for DIY Installers
The Advantages of Doing It Yourself
Important Technical Considerations
---
Things People Often Misunderstand About Audio Wiring
Another frequent misunderstanding is that you can ignore the polarity of the speakers without consequence. If you accidentally wire one subwoofer out of phase (reversing the positive and negative connections), the two speakers will move in opposite directions. When one cone pushes out, the other pulls in, effectively canceling out the bass notes and leaving you with weak, disappointing sound.
Finally, many enthusiasts assume that any amplifier can handle any wiring configuration. Always consult your amplifier's user manual before finalizing your wiring choice. Assuming an amplifier is "1-ohm stable" without verifying can lead to an expensive system failure on your very first listen.
---
Who This Audio Configuration Is Relevant For
* Car Audio Enthusiasts: Drivers who want to elevate their daily commute with deep, immersive bass that factory sound systems simply cannot replicate. * Home Theater Builders: Homeowners designing dedicated media rooms who want to place dual subwoofers in opposing corners of the room to eliminate acoustic dead zones. * Musicians and Producers: Creators working in home studios who require accurate, balanced low-frequency monitoring to mix their tracks effectively. * Budget-Conscious DIYers: Individuals looking to squeeze every ounce of performance out of entry-level gear by optimizing their electrical loads.
---
Getting Started Safely with Your Audio Project
Always disconnect the negative terminal of your vehicle or home battery before working on any electrical connections. Taking these safety precautions prevents accidental short circuits that could damage your delicate audio gear or your property.
If you are ever uncertain about your calculations or how to read a specific schematic, don't hesitate to reach out to online community forums, local specialty shops, or manufacture support lines. A few minutes of careful verification can save you hours of troubleshooting later on.
---
Conclusion
With a clear understanding of impedance, parallel and series wiring, and proper safety protocols, you are well-equipped to design an audio system that brings your favorite media to life with incredible depth and clarity. Take your time, plan your connections carefully, and enjoy the process of building your perfect soundscape.


