
The Ultimate Guide to Understanding Your Subwoofer Setup
If you want to get the most out of your sound system, finding a reliable kicker subwoofer wiring diagram is the essential first step. Getting the wiring right ensures your system delivers clean, deep bass without overloading your amplifier.
Today, DIY car audio installation is more accessible than ever, prompting a massive surge in search interest for proper configuration guides. Let’s dive into why this trend is taking off and how you can safely configure your system for maximum performance.
---
Why Understanding Subwoofer Wiring Is Gaining Attention in the US
At the same time, the rise of online video tutorials and digital schematics has demystified car electronics. Instead of paying premium shop rates for basic installations, enthusiasts are choosing the hands-on approach to build their dream setups.
However, a great sound system relies on more than just buying high-quality components. The physical connection between your amplifier and your speakers dictates how much power your system can safely produce.
Without a clear kicker subwoofer wiring diagram, it is incredibly easy to wire a system incorrectly. This can lead to poor sound quality, overheated equipment, or even permanent damage to your expensive audio gear.
---
How Subwoofer Wiring Actually Works
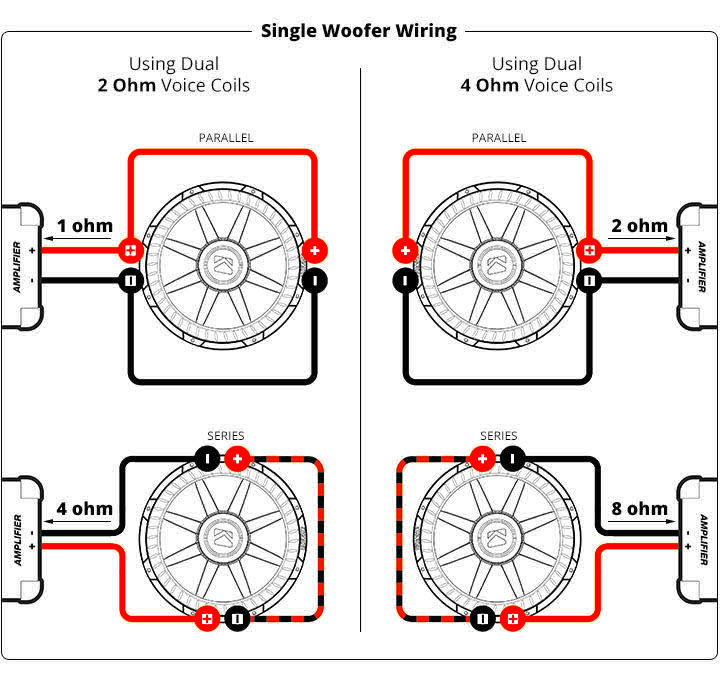
When you look at a wiring schematic, you will generally see two primary methods of connecting your speakers: series wiring and parallel wiring. Each method changes the overall electrical load on your amplifier in a different way.
Series Wiring Explained
To wire in series, you connect the positive terminal of the amplifier to the positive terminal of the first voice coil. Then, you connect the negative terminal of that first coil to the positive terminal of the second coil. Finally, the remaining negative terminal connects back to the amplifier.
This setup adds the impedance of the coils together. For example, wiring two 2-ohm voice coils in series results in a total load of 4 ohms, which reduces the strain on your amplifier.
Parallel Wiring Explained
To wire in parallel, you connect all the positive terminals together and all the negative terminals together. Both sets then connect directly to the corresponding terminals on your amplifier.
When you wire two 2-ohm voice coils in parallel, the total resistance drops to 1 ohm. This allows your amplifier to output significantly more power, provided the amplifier is rated to handle such a low resistance level.
---
Common Questions About Subwoofer Configurations
What is the difference between a single voice coil and a dual voice coil?
Can wiring a subwoofer incorrectly damage my amplifier?
Why does impedance matching matter so much?
Should I choose series or parallel wiring for my daily setup?
---
Opportunities and Considerations of DIY Audio Wiring
The Benefits
The Considerations
---
Things People Often Misunderstand
Another common misconception is that all amplifiers can handle any wiring configuration. Many entry-level amplifiers are only stable down to 2 ohms or 4 ohms, meaning a 1-ohm parallel setup will quickly trigger their protective safety mode.
Finally, people often assume that more subwoofers automatically mean louder bass. In reality, a single properly wired and enclosed subwoofer will easily outperform multiple poorly wired speakers in an incorrect housing.
---
Who This Information Is Relevant For
Daily Commuters
Car Enthusiasts and DIYers
Budget-Conscious Music Lovers
---
Taking the Next Step Safely
Taking a few minutes to plan your connections on paper before handling physical wires can save you hours of troubleshooting later. Always double-check your connections and verify your final impedance with a digital multimeter before powering on your system for the first time.
---
Conclusion
With a patient approach, the right tools, and a clear plan, you will be well on your way to enjoying crystal-clear sound and deep, satisfying bass on every single drive.


